Step 2 – Getting set up in Pyware
At this point, we’re finally ready to open Pyware and get started.
Adjusting your Numbers
The first thing that I always do when starting a new file is open my template file. It’s much easier and faster to start off with a template file rather than create all of your instrumentation/labels manually each time you write. Here’s copies of my template file for various versions: JJVD Template Files.
A few notes on my template file:
- I’ve created a copy in each version (down to version 5) using the version option in the Save dialogue using version 9. Versions 5 and 6 may have some missing elements from the real view.
- Everyone has their own preferred style for their charts and many people have their own labeling system. What I’m sharing is what has worked well for me!
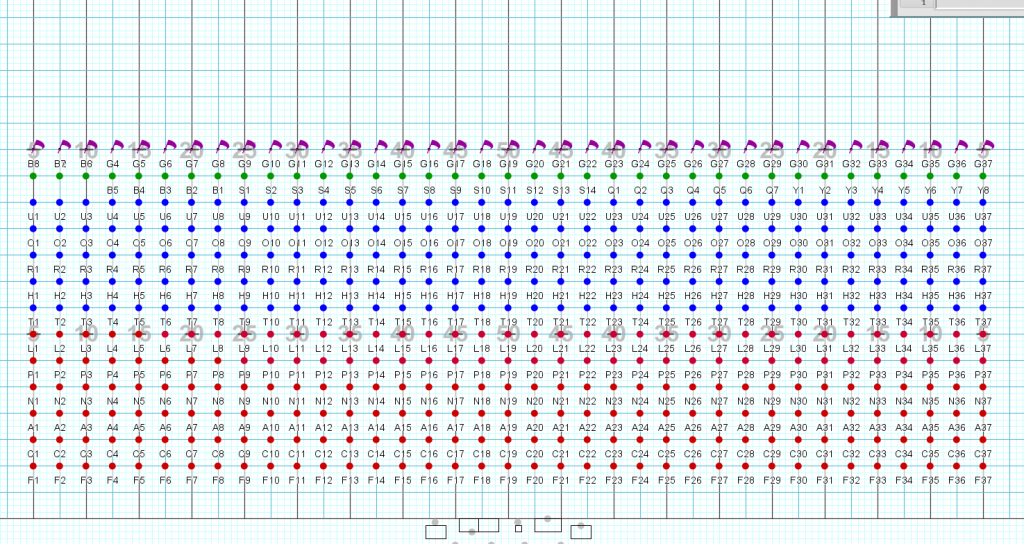
- I use red for woodwinds, blue for brass, green for percussion, and purple for guard.
- The “dot” symbol is my favorite. I use flags for guard but have also used X’s (lowercase p symbol)
- I set all of my instrumentation and uniform settings inside the Visual Editor.
- When you open the file, if you’re in a recent version, you’ll likely get a warning dialogue that some of the performers are locked. This is because I have the front ensemble set up as actual performers, but I lock them so that they aren’t printed when I create coordinate sheets later on.
The first steps you should take when you open the file are:
- Rename the document. Under File > Document Options, on the Preferences tab, enter a name for the file. If you do not, whatever is in this field (“Marching Band Template.3dj”) will show up on your charts when you print.
- Save the file under a different name (File > Save As). This preserves a clean template file for you to use down the road.

Quick Tip: Learn keyboard shortcuts. Pyware has provided an amazing interfacing for creating your own keyboard shortcuts and I highly recommend it. If you’re curious, here’s my JJVD Shortcut File (I regularly tweak it).
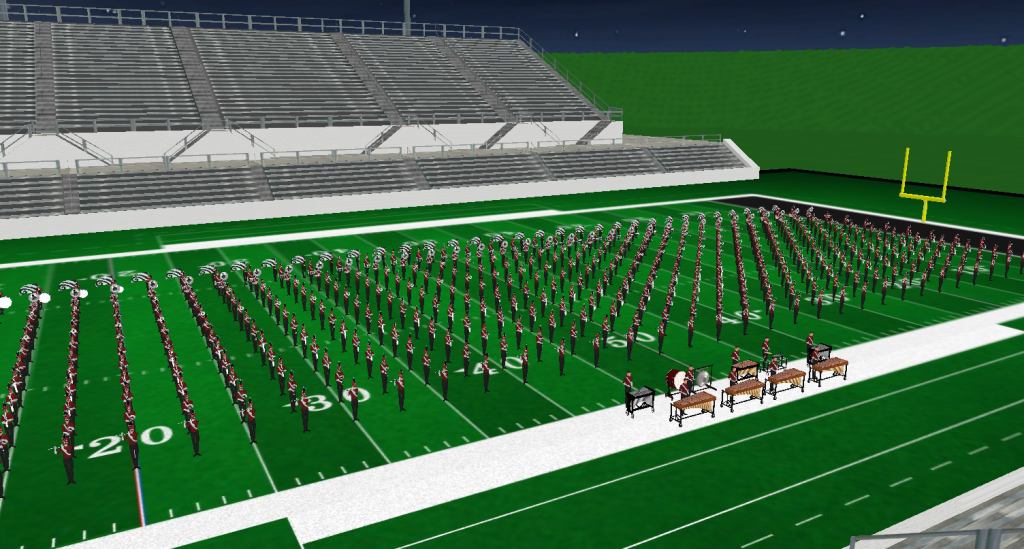
You’re going to see a pretty massive number of performers. This is set up this way because it’s much easier to delete performers than add them. The first thing that I always do is start deleting performers down to the instrumentation I need. Typically, I use the box selection tool.
- Make sure both the yellow and red anchors (triangles) are on count 0.
- Select the performers you don’t need.
- Press delete and then confirm you want to delete those performers.
- Save your file.
Quick Tip: I manually save my file a lot. In addition to that, I love that Pyware added an auto save feature (It’s under the Backups tab in Application Options). Mine is enabled and is set to every 30 minutes. I also maintain 5 backups (on the same tab). Losing your work really sucks. I also use a Robocopy script to backup all of my Pyware files to Dropbox every time I start my computer.
Importing your Production Sheet
Next up, we’ll pull in the production sheet we created in excel. There is one thing to check before we pull the production sheet into Pyware. My template file is set to 300 counts on the timeline. If your movement is going to be more than 300 counts (check the highest number in your “Count” column in your production sheet), you need to add counts BEFORE you import your file. You can add counts by:
- Under “Utilities”, click “Count Editor”
- Click “Add / Remove Counts in Drill”
- Insert the number of counts you need to the end of your file.
Tip here: I always add around 10 additional counts to my files. It comes in handy later when I’m capturing a video of the animation and don’t want the end of the video to jump back to Set 1.
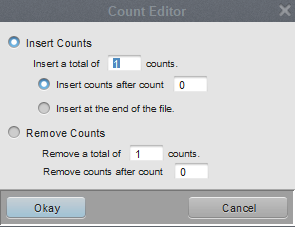
You can also use this to remove counts if you need less than 300 counts, but you can do that before or after importing your production sheet. If you import a sheet with more counts than your file, Pyware will ignore all the sets after the counts cut off.
If you have enough counts:
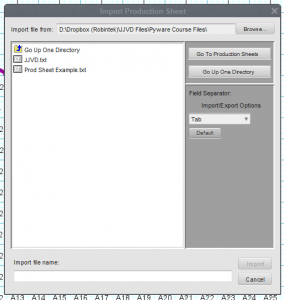
- Under “Utilities”, click “Production Sheet” > “Import”
- In the dialogue window, navigate to the folder where you saved your production sheets.
- Make sure the “Field Separator” is set to “Tab”.
- Select the TXT file, and click Import.
You should see page tabs appear across the bottom of your screen.
Syncing Your Audio
The next step is to sync up your audio file. Depending on the quality/length of the file, and if it includes a click track, this can be a time consuming and frustrating task.
- Under “File”, Select “Document Options” (Ctrl + D). On the Preferences tab, at the bottom under Animation, click “Choose File”. Navigate to the folder where you saved your OGG or WAV file and select it. If you get a warning dialogue about re-entering the sync, click “Yes”
- Make sure both anchors are set to count 0 and click the “Play All” option.
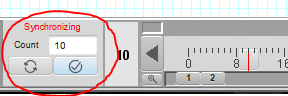
- Click the Audio Option.
- In the “Audio File Synchronization” dialogue window, select which option you want to use to sync. I always use the first option (the spacebar method). It just gives you the most flexibility and seems to give me the most accurate sync.
- When you click “Start Synchronization”, be ready to start hitting space bar immediately.
I almost never get a sync on the first run so I set it up and do it again… In version 9, they added buttons during the synchronization process to accept the sync or restart it (which is amazing). With previous versions, you had to:
- Go back into Document Options (Ctrl D) > Preferences, and click “Clear the Synchronization to Drill”
- Repeat sets 3-5 above.
Marking your Arrival Points
The last thing I like to do before I start in on the really creative part of writing is to mark my “Arrival” or “Impact” points. These are usually holds, although recently I’ve been color coding other types of arrival points (for example, full ensemble entrances, solos etc.). I find that this helps me to always be aware of how many sets I am from an important arrival point.
In previous versions, you could only color code the page tabs across the bottom, but in version 9, they’ve added the ability to color code a range (which I love).
- Double click on a page tab. If pre-version 9, I would double click the page tab at the beginning of an arrival point, if using version 9 and the range option, chose the tab at the end of the arrival point.
- Click the Color button on the bottom of the Dialogue Window.
- Select a color (I use red for my major arrival points).
- Click OK, OK.
Now you’re ready to start writing the show…
If you’re interested in this material, and want to be notified when I add the next post, please take a second and enter your information below!
"*" indicates required fields